Confirmation
{{confirmText}}
Submit Confirmation
{{submitConfirmText}}
Missing Information
{{missingInfoText}}
{{resultExpired}}
{{resultFailed}}
In-Warranty Request for Credit Form
If using Microsoft Edge or Internet Explorer, please select a different browser such as Chrome or FireFox.
Unfortunately, the selection may not work properly using Microsoft Edge or Internet Explorer.
Credit will be issued directly to the distributor that originally purchased the product. For pumps that meet the warranty period according to date of installation but are out of date, please include proof-of-purchase as one of the attachments below.
Distributor Name:
{{warranty.DistName}}
Branch Location:
{{warranty.BranchLocation}}
Branch Address:
{{warranty.Address}}
Phone:
{{warranty.PhoneNumber}}
Fax:
{{warranty.FaxNumber}}
Rep Agency:
{{warranty.RepAgency}}
Rep Name:
{{warranty.RepName}}
Request Date:
{{warranty.DateSigned}}
FD#:
{{warranty.FDNumber}}
Status
{{warranty.Status}}
We're sorry but the request to edit this information has expired.
| Edit | Part Number | P.O. | Purchase Date | Install Date | Mfg. Date | Status | Delete |
|---|---|---|---|---|---|---|---|
| {{req.Item}} | {{req.CustPO}} | {{req.PurchaseDate}} | {{req.InstallDate}} | {{req.MfgDate}} | {{warranty.Status}} |
Item
{{req.Item}}
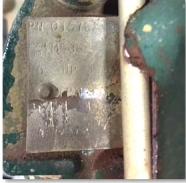
Examples of images to upload
STEP #1 - Cut the power cord AT THE PUMP and take a CLEAR picture of the pump and the END of the power cord with proper pump identification sticker.
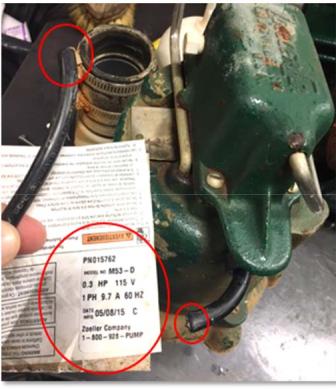
STEP #2 – Remove brass or stainless ID tag on pump and destroy both pump and tag.
Warranty Request
✖
Required Fields
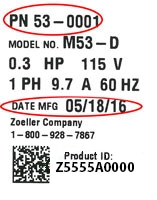
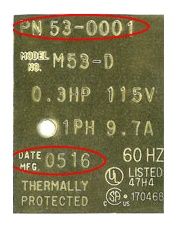
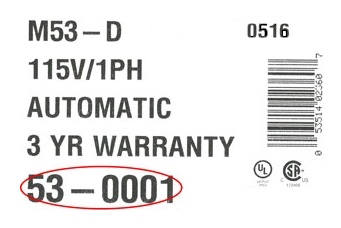
Part Number:
{{resultItem}}
{{resultInvalid}}
*needs complete part number i.e. 267-0001
Manufactured Date:
{{resultMfg}}
Purchase Date:
{{resultPurc}}
{{resultPvM}}
Install Date:
{{resultInst}}
{{resultIvP}}
Failure Date:
{{resultFailD}}
{{resultFvI}}
Customer PO/DEBIT Memo:
{{resultCust}}
Invoice:
{{resultInv}}
Product ID Number:
{{resultPid}}
Additional Notes:
{{resultWar}}
If not, explain:
Attach Images for Warranty Tag, Cord, and Pump
(Click for image example)
{{resultImg0}}
{{resultImg}}
X
STEP #1 - Cut the power cord AT THE PUMP and take a CLEAR picture of the pump and the END of the power cord with proper pump identification sticker.
STEP #2 – Remove brass or stainless ID tag on pump and destroy both pump and tag.